Monday, December 29, 2008
Sunday, November 16, 2008

Monday, November 10, 2008

Sunday, November 2, 2008
At the paint shop
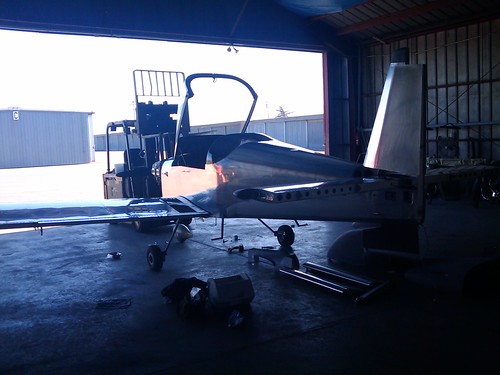
Disassembled all the control surfaces, fairings, wingtips, inspection panels in about 4 hours.
Monday, September 1, 2008
Sunday, August 3, 2008
Cheap and easy O2 bottle mount

Two small chunks of .063 aluminum and two large hose clamps from OSH. Seems plenty sturdy.
Sunday, July 27, 2008


High speed serial with Arduino / Protoduino
Sadly, Arduino is not capable of high speed serial -- by that I mean 115200 or even 57.6k baud.
Most Arduino boards have a 16MHz crystal, which does not mesh well with the common baud rates above 19.2K, causing frequent dropped/garbage characters. It actually doesn't mesh very well with any common baud rate, but it's worst above 38.4K. It's a horrible choice of clock speeds.
 (The crystal is that silver thing in the middle. Look close and you'll see "16.000" printed on it)
My Dynon EFIS transmits data only at 115.2K, and I would love to do something with that data...what to do? The ATMEGA chip at the core of Arduino can do it, but that crystal is all wrong. From the ATMEGA168 data sheet:
 This 2-3% error is enough for you to get a handful of characters through ok, but after that you'll start getting garbage.
Fortunately, there is a pretty easy solution. You can go to an electronics store, or go online, and purchase a 11.0592Mhz crystal (with 20pF load capacitance -- part X1103-ND from Digikey works). This is a special "UART crystal" whose frequency is exactly what you need for these higher baud rates. Observe:
 If you're feeling brave you can de-solder the crystal from an existing Arduino board, or buy a seperate standalone board and install the slower crystal instead.
(If you're concerned about the slower processing speed at 11MHz, there is also another good UART frequency at 18-MHz-and-change, but to use it you are supposed to set the ATMEGA fuses to run the clock at a higher power setting, leading to reduced battery life. I didn't find that setting to be necessary, but your mileage may vary.)
The other piece of the equation is that you need to inform the software you'll be running of the different clock speed, otherwise all your timing (including the serial operations you're trying to get working) will be way off.
To do this, you'll need a machine capable of running Makefiles and gcc. That means downloading Xcode if you're on a mac, or cygwin on Widnows. Linux boxes can just install Make/gcc packages if not installed already.
Then go here to get a standalone Makefile for arduino programs:
http://www.arduino.cc/en/uploads/Hacking/Makefile
Put your .pde program in the same directory of the Makefile, then follow the directions in the Makefile to get it set up. Lastly, modify the F_CPU line in the Makefile to the new clock speed (11059200). Note that you need to "make clean" anytime you change the clock speed so that everything gets rebuilt with the new constant. Then "make" to build and "make upload" to upload to the board.
When combined with an MC1489 receiver and a Protoduino board, the result is a multi-LED bar-graph that speaks flawlessly at 115.2Kbps:

Most Arduino boards have a 16MHz crystal, which does not mesh well with the common baud rates above 19.2K, causing frequent dropped/garbage characters. It actually doesn't mesh very well with any common baud rate, but it's worst above 38.4K. It's a horrible choice of clock speeds.
(The crystal is that silver thing in the middle. Look close and you'll see "16.000" printed on it)My Dynon EFIS transmits data only at 115.2K, and I would love to do something with that data...what to do? The ATMEGA chip at the core of Arduino can do it, but that crystal is all wrong. From the ATMEGA168 data sheet:
 This 2-3% error is enough for you to get a handful of characters through ok, but after that you'll start getting garbage.
Fortunately, there is a pretty easy solution. You can go to an electronics store, or go online, and purchase a 11.0592Mhz crystal (with 20pF load capacitance -- part X1103-ND from Digikey works). This is a special "UART crystal" whose frequency is exactly what you need for these higher baud rates. Observe:
 If you're feeling brave you can de-solder the crystal from an existing Arduino board, or buy a seperate standalone board and install the slower crystal instead.
(If you're concerned about the slower processing speed at 11MHz, there is also another good UART frequency at 18-MHz-and-change, but to use it you are supposed to set the ATMEGA fuses to run the clock at a higher power setting, leading to reduced battery life. I didn't find that setting to be necessary, but your mileage may vary.)
The other piece of the equation is that you need to inform the software you'll be running of the different clock speed, otherwise all your timing (including the serial operations you're trying to get working) will be way off.
To do this, you'll need a machine capable of running Makefiles and gcc. That means downloading Xcode if you're on a mac, or cygwin on Widnows. Linux boxes can just install Make/gcc packages if not installed already.
Then go here to get a standalone Makefile for arduino programs:
http://www.arduino.cc/en/uploads/Hacking/Makefile
Put your .pde program in the same directory of the Makefile, then follow the directions in the Makefile to get it set up. Lastly, modify the F_CPU line in the Makefile to the new clock speed (11059200). Note that you need to "make clean" anytime you change the clock speed so that everything gets rebuilt with the new constant. Then "make" to build and "make upload" to upload to the board.
When combined with an MC1489 receiver and a Protoduino board, the result is a multi-LED bar-graph that speaks flawlessly at 115.2Kbps:

Saturday, July 19, 2008
AOA Protoduino flies
I have this nice Dynon EFIS in my airplane. It does just about everything all those old-fashioned airplane instruments do, all in one package, as well as some fancier things like an angle-of-attack readout (lower left colored bar)
 While that AOA readout is great for making smooth landings, it's tough to see with a quick glance away from the runway that's approaching at freeway speeds.
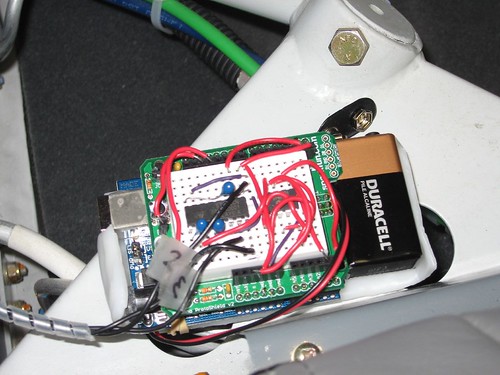
So after getting Arduino to speak serial at 115.2Kbps by replacing the crystal and hand-compiling the binary images, I was able to connect my Dynon EFIS to a Protoduino board and set up a nice angle-of-attack and rotation-speed readout, right in my line of sight on top of the glareshield.
 ATMEGA168 on the left, MC1489 on the right. Switch in the middle controls brightness.
 Here's a view of it installed, from outside the airplane.
The 9 LEDs create a "bar graph" of the current angle-of-attack -- I have it set up so that any less than 3 LEDs is closer to stall than I want to be during the landing sequence. On takeoff, it will flash a few LEDs at rotation speed and Vy. The display dims with each press of the pushbutton in the middle.
The board is a Protoduino trimmed to remove the top half which wasn't needed for this project, and to keep the size small and inobtrusive. Since there's no need for outgoing serial communications, there's no need for a MAX232 or anything like that -- I just used a MC1489 quad-receiver which translates the incoming RS232 signal to TTL levels.
Here's a view in flight. You can just barely see the multi-color AOA display in the lower-left corner of the Dynon. The LEDs are quite a bit easier to see!

While that AOA readout is great for making smooth landings, it's tough to see with a quick glance away from the runway that's approaching at freeway speeds.So after getting Arduino to speak serial at 115.2Kbps by replacing the crystal and hand-compiling the binary images, I was able to connect my Dynon EFIS to a Protoduino board and set up a nice angle-of-attack and rotation-speed readout, right in my line of sight on top of the glareshield.
 ATMEGA168 on the left, MC1489 on the right. Switch in the middle controls brightness.
 Here's a view of it installed, from outside the airplane.
The 9 LEDs create a "bar graph" of the current angle-of-attack -- I have it set up so that any less than 3 LEDs is closer to stall than I want to be during the landing sequence. On takeoff, it will flash a few LEDs at rotation speed and Vy. The display dims with each press of the pushbutton in the middle.
The board is a Protoduino trimmed to remove the top half which wasn't needed for this project, and to keep the size small and inobtrusive. Since there's no need for outgoing serial communications, there's no need for a MAX232 or anything like that -- I just used a MC1489 quad-receiver which translates the incoming RS232 signal to TTL levels.
Here's a view in flight. You can just barely see the multi-color AOA display in the lower-left corner of the Dynon. The LEDs are quite a bit easier to see!

Friday, April 11, 2008
Thursday, April 10, 2008
Yuri's Night
I will be displaying the airplane at Yuri's Night Bay Area 2008, at Moffett Field, this Saturday April 12.
For first-time visitors to this site, here's a link to the airplane construction page.
For first-time visitors to this site, here's a link to the airplane construction page.
Sunday, March 30, 2008
Relocated to RHV
My new hangar is closer to home, costs the same but is worse in every way. Water has already leaked in and ruined some of my stuff, and the oil-stained asphalt floor is the pits. Oh well, hopefully I'll be able to fly more often.


Here's my "fiberglass taco" aileron stop. I'll stick that cloth in there permanently, and add a bungee to attach it to the aileron weldment.


Here's my "fiberglass taco" aileron stop. I'll stick that cloth in there permanently, and add a bungee to attach it to the aileron weldment.

Friday, February 22, 2008
Some flight tracks from my GPS logger
Made from an Arduino Diecimilla board, a SparkFun Protoshield, a MAX232 for serial interface, and a Serial i2c 32KB EEPROM also from SparkFun. With some simple compression of the lat/long and altitude data I can store about 10 hours of flight data on the rather small eeprom.
Wednesday, February 6, 2008
Sunday, January 20, 2008
Thursday, January 17, 2008
Bay Tour
Nice day for a bay tour, but everyone else had the same idea -- was dodging traffic the whole way.


Subscribe to:
Posts (Atom)